![]() I plotted a course to the restaurant.
I plotted a course to the restaurant.
Getting driving directions may be the least intuitive thing to do on the iPhone. Add your own address to your Contacts first. It will make things much easier later.
With some help from Google it is easy to find and call a place of business. I opened up Safari and searched for the name of the restaurant and the city. There it was, with the phone number first and it was hyperlinked. I tapped on the phone number and it offered to dial it for me. Who wouldn't love that? As I was making our reservations, I resisted the impulse to say "Yes, table for 6 and I am calling from an iPhone"
After the call, I went to Phone, Recents and added the restaurant to my Contacts list. (When we get there tomorrow I need to remember to include a photo of it. Hey, if you're not going to have fun, why buy an iPhone?)
Adding it to the Contacts along with the address turned out to be a good idea. I found out next that the easiest way to explain a location to the Maps application is to select it from the bookmarked locations. The easiest way to bookmark a location is to select it from the list of Contacts. Got it?
Here is the sequence:
First add the address of the location in Phone, Contacts. Be sure you've added your own address as a Contact, too, as it is much easier to select it as the Start of your trip.
Second, open the Maps application, click the up/down arrows icon in the bottom left corner of the screen.
Third, select the Start and End locations from your Contacts or your Map Bookmarks, or if you like to suffer, try searching for each of them using those really tiny input areas.
- Bookmarking Locations the Easy Way:
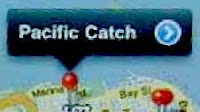
 The Maps application pins a label of the location you've found on the map for you and the label includes a blue right arrow. Tap it to see an Info screen which includes an 'Add to Bookmarks' button. Tap it. That was the hard part. Once you've bookmarked both your destination and your starting point things get a lot easier. If you have tried, tried again to establish the location of a place by searching you might also find it in your list of Recents.
Third, tap the Route button. The route is highlighted for you from pin to pin on the map. There is also a List button that spells out the directions for the topographically impaired.
Now the fun begins. Tap the Start button. You will be treated to a visually appealing animated version of your trip right on the surface of the map with the directions spelled out at the top of the screen. If current traffic conditions are available for your area, you can see them by tapping the little car icon on the bottom right of the screen. Even Michael Knight would be envious.
Remember, iPhoning and driving don't mix.

